In this tutorial , you will learn how to create this Smoke text effect in Photoshop. So just follow the steps and learn this easy method to create it for yourself . So let's get started!

Download Photoshop :- https://prf.hn/l/OVRDLJm
Equipment I use :-
Primary Laptop :- https://amzn.to/3BLqADZ
Secondary Laptop :- https://amzn.to/3wryYWo
Mouse :- https://amzn.to/3zsnuCH
Smoke Brush Download Link :- https://www.deviantart.com/perpetualstudios/art/Smoke-Brushes-Six-142198355
Bebas Neue Font Download Link :- https://www.dafont.com/bebas-neue.font
Final Image PSD Download Link :- https://drive.google.com/open?id=1IE1xTb9x70FinKGwEP5grtfOxlZsDf8l
Youtube Video :-
Steps on how to create Smoke text effect in Photoshop :-
So the first step is to create a new document , so for that go to File and then select new over there


After that set the dimensions in the Pop up as follows :- Width : 1280px , Height , 720px , Resolution : 150px/inch , Background : Transparent and then click on Ok.

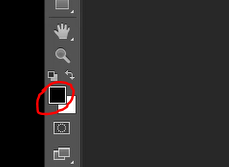
Now set the foreground color as Black and then fill the document using that color using Paint bucket tool


After that create a duplicate of the layer by pressing CTRL + J

Now go to Filter and then Render and then select Clouds over there

Then reduce the opacity of the layer to 10%


Now set the Foreground color as white

Select Horizontal type tool and then select any font of your choice and set its appropriate size


After that click anywhere on the document and then start typing your text

Now place the text properly using move tool


Now create a new layer by clicking on create new layer icon

Then drag the newly created layer below text layer

Now select brush tool and then set the foreground color as white


After that click on Toggle brush panel icon

Then select any smoke brush (After selecting a brush and clicking it in the document it will give the smoke effect of that shape) , so change it's size and even rotate it if necessary for best effect


After that click on the document using it which will give the smoke effect (Note : if the smoke effect is not proper then you can CTRL + Z which will revert the previous step and then you can place it again )


Now after the smoke has been placed properly over the text then press CTRL and click on newly created layer icon

This will give you selection of this layer i.e Smoke

Then make the text layer active and then press ALT and click on add layer mask icon which will give text better effect


Now to make it look even better select brush tool and brush as Soft round


Now to remove the some parts of the text make the foreground color as black and then click and hover over the parts of the text using brush to remove it and if you want to bring back parts of the text then make the foreground color as white and then click and hover over the parts using brush to bring it back which will give you best smoke text effect


Now click on Add layer style icon and then select Blending options over there

Then in the pop up click on Drop shadow and set the following , Blend mode : Multiply , Opacity : 75% , Angle : 90deg , Distance : 5px , Spread : 0% , Size : 5px and then click on Outer glow and set the following , Blend mode : Screen , Opacity : 30% , Color : White , Spread : 0% , Size : 5px and then click on Ok


So this will give you your Smoke text effect in Photoshop !

So that's it guys! So now if you guys liked this tutorial then hit the like button also share it to the ones who might be interested in such tutorials!
Youtube Video :-
Related :-
Bend 3D Text Effect in Photoshop :- https://www.photoshop-tutorial.com/post/bend-3d-text-effect-in-photoshop
Creative Text Inside Image in Photoshop :- https://www.photoshop-tutorial.com/post/creative-image-inside-text-effect
Powder Blast Text Effect in Photoshop :- https://www.photoshop-tutorial.com/post/powder-blast-text-effect-in-photoshop
Transparent Text Effect in Photoshop :- https://www.photoshop-tutorial.com/post/transparent-text-effect-in-photoshop
Powerful Text Wrap Portrait Effect in Photoshop :- https://www.photoshop-tutorial.com/post/powerful-text-wrap-portrait-effect-in-photoshop

Comments