In this tutorial , you will learn how to give this awesome face peel effect to your Photos in Photoshop . By looking at the final image below the effect looks complicated but it is not so just follow the steps below and learn how to create it for yourself . So let's get started!
![Face peel effect](https://static.wixstatic.com/media/a08182_a5c97af56f304d3f887882f694da6da0~mv2_d_4133_2112_s_2.jpg/v1/fill/w_980,h_501,al_c,q_85,usm_0.66_1.00_0.01,enc_avif,quality_auto/a08182_a5c97af56f304d3f887882f694da6da0~mv2_d_4133_2112_s_2.jpg)
Download Photoshop :- https://prf.hn/l/OVRDLJm
Equipment I use :-
Primary Laptop :- https://amzn.to/3BLqADZ
Secondary Laptop :- https://amzn.to/3wryYWo
Mouse :- https://amzn.to/3zsnuCH
Original Image Download link :-https://www.pexels.com/photo/women-s-white-and-black-button-up-collared-shirt-774909
PSD file on final image with effect :-https://drive.google.com/open?id=1QTVkw-fwSjRO35uhC9DcOpvmFxnkuL5v
Youtube video :-
Steps on how to create this Face peel effect in Photoshop :-
So the first step is to select Quick selection tool
![Quick selection tool in Photoshop](https://static.wixstatic.com/media/a08182_05ffae237e60493d8cca2aca85cba6ad~mv2.png/v1/fill/w_258,h_293,al_c,q_85,enc_avif,quality_auto/a08182_05ffae237e60493d8cca2aca85cba6ad~mv2.png)
Now using Quick selection tool just select the Face of the model in the image as show below
![Face selection in Photoshop](https://static.wixstatic.com/media/a08182_1f6d85d7d1dd44c583a2661069cc29e3~mv2.png/v1/fill/w_614,h_505,al_c,q_85,enc_avif,quality_auto/a08182_1f6d85d7d1dd44c583a2661069cc29e3~mv2.png)
After the selection click on Add layer mask icon
![Layer mask icon in Photoshop](https://static.wixstatic.com/media/a08182_a7bde90196e84bb2949a8736a5bb935a~mv2.png/v1/fill/w_281,h_109,al_c,q_85,enc_avif,quality_auto/a08182_a7bde90196e84bb2949a8736a5bb935a~mv2.png)
This will only keep your selection i.e Face of the model and remove rest of the background as shown in the below image
![Remove background and keeping only face in Photoshop](https://static.wixstatic.com/media/a08182_d863e6aae8a74ea78c84f06a435e8d21~mv2.png/v1/fill/w_760,h_477,al_c,q_90,enc_avif,quality_auto/a08182_d863e6aae8a74ea78c84f06a435e8d21~mv2.png)
Now select the crop tool
![Crop tool icon in Photoshop](https://static.wixstatic.com/media/a08182_bed7f10fb8774ef28f678687087b64cc~mv2.png/v1/fill/w_373,h_222,al_c,q_85,enc_avif,quality_auto/a08182_bed7f10fb8774ef28f678687087b64cc~mv2.png)
And using it crop and resize the Background of the image accordingly as shown in the below Image
![Cropping in Photoshop](https://static.wixstatic.com/media/a08182_79d1380370a64e9893388e925d624e78~mv2.png/v1/fill/w_854,h_766,al_c,q_90,enc_avif,quality_auto/a08182_79d1380370a64e9893388e925d624e78~mv2.png)
Now create a new layer by clicking on create new layer icon
![Create new layer icon in Photoshop](https://static.wixstatic.com/media/a08182_b2b28e16baf74848add0e00dffda8f9d~mv2.png/v1/fill/w_483,h_599,al_c,q_85,enc_avif,quality_auto/a08182_b2b28e16baf74848add0e00dffda8f9d~mv2.png)
And then drag that newly created layer and bring it below the model layer as shown in the below image
![swapping layers in Photoshop](https://static.wixstatic.com/media/a08182_21252b34d9014ab3bf7bad756cbeca2e~mv2.png/v1/fill/w_397,h_148,al_c,q_85,enc_avif,quality_auto/a08182_21252b34d9014ab3bf7bad756cbeca2e~mv2.png)
After that click on Foreground color icon and then replace it with any dark grey color and then click on Ok
![Foreground color icon in Photoshop](https://static.wixstatic.com/media/a08182_576f122ee89e497b9b979d352197598d~mv2.png/v1/fill/w_229,h_167,al_c,q_85,enc_avif,quality_auto/a08182_576f122ee89e497b9b979d352197598d~mv2.png)
![Foreground color picker in Photoshop](https://static.wixstatic.com/media/a08182_d764e8c9d4e545d284715a371079fa4a~mv2.png/v1/fill/w_585,h_364,al_c,q_85,enc_avif,quality_auto/a08182_d764e8c9d4e545d284715a371079fa4a~mv2.png)
Now fill the background with that color using Paint bucket tool as shown
![Paint bucket tool icon in Photoshop](https://static.wixstatic.com/media/a08182_6641bb94cf254bb9ae5ce8e0c5aee81e~mv2.png/v1/fill/w_682,h_218,al_c,q_85,enc_avif,quality_auto/a08182_6641bb94cf254bb9ae5ce8e0c5aee81e~mv2.png)
![](https://static.wixstatic.com/media/a08182_b76e347ff7444358a80bddb056fecda8~mv2.png/v1/fill/w_980,h_456,al_c,q_90,usm_0.66_1.00_0.01,enc_avif,quality_auto/a08182_b76e347ff7444358a80bddb056fecda8~mv2.png)
Now click on add layer style icon and select Blending options over there
![Blending options icon in Photoshop](https://static.wixstatic.com/media/a08182_675b317c6b8040ecb74324b36928fcb0~mv2.png/v1/fill/w_383,h_306,al_c,q_85,enc_avif,quality_auto/a08182_675b317c6b8040ecb74324b36928fcb0~mv2.png)
After that click on Gradient overlay in the pop up that appears and then set the following :- Blend Mode : Soft light , Opacity : 60% , Gradient : Foreground to background , Tick on Reverse , Style : Radial , Scale : 150% and after that click on Ok
![Gradient overlay settings in Photoshop](https://static.wixstatic.com/media/a08182_c532c226fe5d4cf9b5275e5793e8e224~mv2.png/v1/fill/w_774,h_558,al_c,q_90,enc_avif,quality_auto/a08182_c532c226fe5d4cf9b5275e5793e8e224~mv2.png)
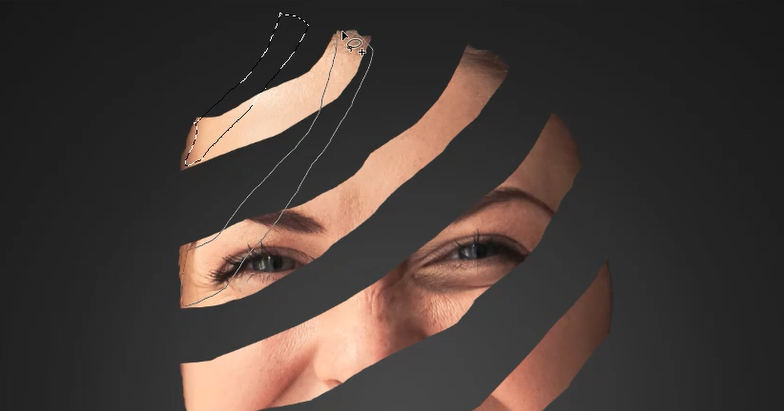
Now select Lasso tool
![Lasso tool icon in Photoshop](https://static.wixstatic.com/media/a08182_b9952c46b23f4d2a800c9af232668b4e~mv2.png/v1/fill/w_488,h_146,al_c,q_85,enc_avif,quality_auto/a08182_b9952c46b23f4d2a800c9af232668b4e~mv2.png)
And after that click on Add to selection icon to do multiple selections using Lasso tool at a time
![Add to selection icon in Photoshop](https://static.wixstatic.com/media/a08182_c23dcfc82a7240a8abc30152a007e8b3~mv2.png/v1/fill/w_331,h_110,al_c,q_85,enc_avif,quality_auto/a08182_c23dcfc82a7240a8abc30152a007e8b3~mv2.png)
After that make a selection on the face and selection should be a curved one as show in the below image
![Selection using Lasso tool in Photoshop](https://static.wixstatic.com/media/a08182_47d7d259b9ae4d9b82f1064b45405dbc~mv2.png/v1/fill/w_980,h_566,al_c,q_90,usm_0.66_1.00_0.01,enc_avif,quality_auto/a08182_47d7d259b9ae4d9b82f1064b45405dbc~mv2.png)
Now as you had clicked on Add to selection icon you can do multiple selection at a time , so now like this way there should be multiple selections covering main parts of the face as in the below image
![Multiple selections using Lasso tool in Photoshop](https://static.wixstatic.com/media/a08182_3a8fc7a80881491c98bfbac7418c035a~mv2.png/v1/fill/w_980,h_672,al_c,q_90,usm_0.66_1.00_0.01,enc_avif,quality_auto/a08182_3a8fc7a80881491c98bfbac7418c035a~mv2.png)
And after the selection is done , we need a selection of the whole image just skipping the current selection so for that press CTRL + SHIFT + I and this will invert the selection i.e The one that was selected will now not be selected and the one that was not selected will now be selected
![Shortcut to invert selection in Photoshop](https://static.wixstatic.com/media/a08182_479c726d3db04b168736d84bcc99bfe5~mv2.png/v1/fill/w_980,h_628,al_c,q_90,usm_0.66_1.00_0.01,enc_avif,quality_auto/a08182_479c726d3db04b168736d84bcc99bfe5~mv2.png)
Then make the layer mask of the model layer active
![Make model layer mask active](https://static.wixstatic.com/media/a08182_3ea357fd7776469a92f48e9af686f4cf~mv2.png/v1/fill/w_366,h_208,al_c,q_85,enc_avif,quality_auto/a08182_3ea357fd7776469a92f48e9af686f4cf~mv2.png)
Then make sure that the foreground color is black and then press ALT + Backspace to remove the selection
![Foreground color black in Photoshop](https://static.wixstatic.com/media/a08182_58cd58a85dad4cddab1c201cc35b313d~mv2.png/v1/fill/w_337,h_196,al_c,q_85,enc_avif,quality_auto/a08182_58cd58a85dad4cddab1c201cc35b313d~mv2.png)
![After pressing ALT + Backspace in Photoshop](https://static.wixstatic.com/media/a08182_993954a9a32547da89d7f56fadbc7a1f~mv2.png/v1/fill/w_980,h_670,al_c,q_90,usm_0.66_1.00_0.01,enc_avif,quality_auto/a08182_993954a9a32547da89d7f56fadbc7a1f~mv2.png)
Now press CTRL + D to deselect the selection
![Press CTRL + D in Photoshop to deselect a selection](https://static.wixstatic.com/media/a08182_51fda22341c84dada88384099efa8137~mv2.png/v1/fill/w_980,h_666,al_c,q_90,usm_0.66_1.00_0.01,enc_avif,quality_auto/a08182_51fda22341c84dada88384099efa8137~mv2.png)
Then create a new layer and after that select lasso tool
![Click on Create new layer icon in Photoshop to create a new layer](https://static.wixstatic.com/media/a08182_e2e3e61aeefb4b91b53097e40b4e8254~mv2.png/v1/fill/w_365,h_586,al_c,q_85,enc_avif,quality_auto/a08182_e2e3e61aeefb4b91b53097e40b4e8254~mv2.png)
![Lasso tool icon in Photoshop](https://static.wixstatic.com/media/a08182_b9952c46b23f4d2a800c9af232668b4e~mv2.png/v1/fill/w_488,h_146,al_c,q_85,enc_avif,quality_auto/a08182_b9952c46b23f4d2a800c9af232668b4e~mv2.png)
Then using the tool make a selection between 2 strips of the face giving circular effect as shown below
![Selection using Lasso tool in Photoshop](https://static.wixstatic.com/media/a08182_3ebe174afe104cdb86bd2bc15d2271f3~mv2.png/v1/fill/w_784,h_411,al_c,q_85,enc_avif,quality_auto/a08182_3ebe174afe104cdb86bd2bc15d2271f3~mv2.png)
So like this do for each gaps
![](https://static.wixstatic.com/media/a08182_dbaf236be18e407abd678f327bbdac82~mv2.png/v1/fill/w_968,h_701,al_c,q_90,enc_avif,quality_auto/a08182_dbaf236be18e407abd678f327bbdac82~mv2.png)
Now make the foreground color as any skin color and then press ALT + backspace to fill the selection with that color
![Set foreground color to skin in Photoshop](https://static.wixstatic.com/media/a08182_35431b30c14840aeb68979e2c9be9f98~mv2.png/v1/fill/w_295,h_156,al_c,q_85,enc_avif,quality_auto/a08182_35431b30c14840aeb68979e2c9be9f98~mv2.png)
![Press ALT + Backspace to fill the selection with Foreground color in Photoshop](https://static.wixstatic.com/media/a08182_746e3f1c17574556a593cb573054d6ef~mv2.png/v1/fill/w_931,h_712,al_c,q_90,enc_avif,quality_auto/a08182_746e3f1c17574556a593cb573054d6ef~mv2.png)
After that press CTRL + D to deselect the selection
Then bring this layer below model layer as shown
![](https://static.wixstatic.com/media/a08182_43f7f07465d546f9baa3f3af424851c1~mv2.png/v1/fill/w_359,h_169,al_c,q_85,enc_avif,quality_auto/a08182_43f7f07465d546f9baa3f3af424851c1~mv2.png)
Now if the circular effect is not looking proper then press CTRL + T and then right click and select Warp over there
![Press CTRL + T and right click and select Warp over there](https://static.wixstatic.com/media/a08182_ce8f974bc5124a6a9211b51466910878~mv2.png/v1/fill/w_796,h_732,al_c,q_90,enc_avif,quality_auto/a08182_ce8f974bc5124a6a9211b51466910878~mv2.png)
After that play with the edges to get the perfect circular effect proper
![Warp in Photoshop](https://static.wixstatic.com/media/a08182_26b1d4dbced74b8ca1ccd81fa23875ee~mv2.png/v1/fill/w_674,h_683,al_c,q_90,enc_avif,quality_auto/a08182_26b1d4dbced74b8ca1ccd81fa23875ee~mv2.png)
Once the effect looks proper then click on the tick icon above . Now we have to add shadows to the edges so for that create a new layer and then right click on the layer and select Create clipping mask over there so that whatever we do inside this layer will only effect one layer below it and not the rest of the layers below
![Create new layer in Photoshop](https://static.wixstatic.com/media/a08182_693bd9b1fc7949f5be59bb5c1336e641~mv2.png/v1/fill/w_428,h_586,al_c,q_85,enc_avif,quality_auto/a08182_693bd9b1fc7949f5be59bb5c1336e641~mv2.png)
![Right click on the layer and select Create Clipping mask over there in Photoshop](https://static.wixstatic.com/media/a08182_75e570a9f6fb496d9e293d00f3b42575~mv2.png/v1/fill/w_524,h_330,al_c,q_85,enc_avif,quality_auto/a08182_75e570a9f6fb496d9e293d00f3b42575~mv2.png)
After that make the foreground color as black and then select brush tool
![Set Foreground color as black in Photoshop](https://static.wixstatic.com/media/a08182_58cd58a85dad4cddab1c201cc35b313d~mv2.png/v1/fill/w_337,h_196,al_c,q_85,enc_avif,quality_auto/a08182_58cd58a85dad4cddab1c201cc35b313d~mv2.png)
![Brush tool icon in Photoshop](https://static.wixstatic.com/media/a08182_b44aa3b7e9e24af3b9f949d4ae1e2830~mv2.png/v1/fill/w_532,h_262,al_c,q_85,enc_avif,quality_auto/a08182_b44aa3b7e9e24af3b9f949d4ae1e2830~mv2.png)
Now select the brush as soft round and reduce it's opacity to 40%
![Select brush as soft round in Photoshop](https://static.wixstatic.com/media/a08182_1db80126973649ec96ac59aca8d417c1~mv2.png/v1/fill/w_394,h_331,al_c,q_85,enc_avif,quality_auto/a08182_1db80126973649ec96ac59aca8d417c1~mv2.png)
![Setting opacity of brush in Photoshop](https://static.wixstatic.com/media/a08182_3ffaff81ac224e839d2f0c909afc9428~mv2.png/v1/fill/w_616,h_165,al_c,q_85,enc_avif,quality_auto/a08182_3ffaff81ac224e839d2f0c909afc9428~mv2.png)
Now using the tool click and hover over the edges of the skin color layer which will give shadow like effect
![Adding shadow to edges using brush tool in Photoshop](https://static.wixstatic.com/media/a08182_ed0fc37314c74725904752859859ae69~mv2.png/v1/fill/w_712,h_608,al_c,q_90,enc_avif,quality_auto/a08182_ed0fc37314c74725904752859859ae69~mv2.png)
And do this same thing for all the edges
![Adding shadow using brush tool in Photoshop](https://static.wixstatic.com/media/a08182_1c1d29cd7e3a4da1b926fdd5a4e4be85~mv2.png/v1/fill/w_722,h_677,al_c,q_90,enc_avif,quality_auto/a08182_1c1d29cd7e3a4da1b926fdd5a4e4be85~mv2.png)
So this will give you your Face peel effect in Photoshop!
![Face peel effect in Photoshop](https://static.wixstatic.com/media/a08182_a5c97af56f304d3f887882f694da6da0~mv2_d_4133_2112_s_2.jpg/v1/fill/w_980,h_501,al_c,q_85,usm_0.66_1.00_0.01,enc_avif,quality_auto/a08182_a5c97af56f304d3f887882f694da6da0~mv2_d_4133_2112_s_2.jpg)
So now if you guys liked this tutorial then hit that love button also share it to the ones who might be interested in such tutorial!
Youtube Video :-
Thank you !
Opmerkingen